DevOps Homelab #1 - Install GitLab Server & Runner
Install GitLab CE and GitLab Runner using Docker Compose on Ubuntu Server. Part one of building a complete CI/CD pipeline on-premise from scratch.

Prerequisites
- docker
- docker compose
- virtual machine linux ubuntu 24.04
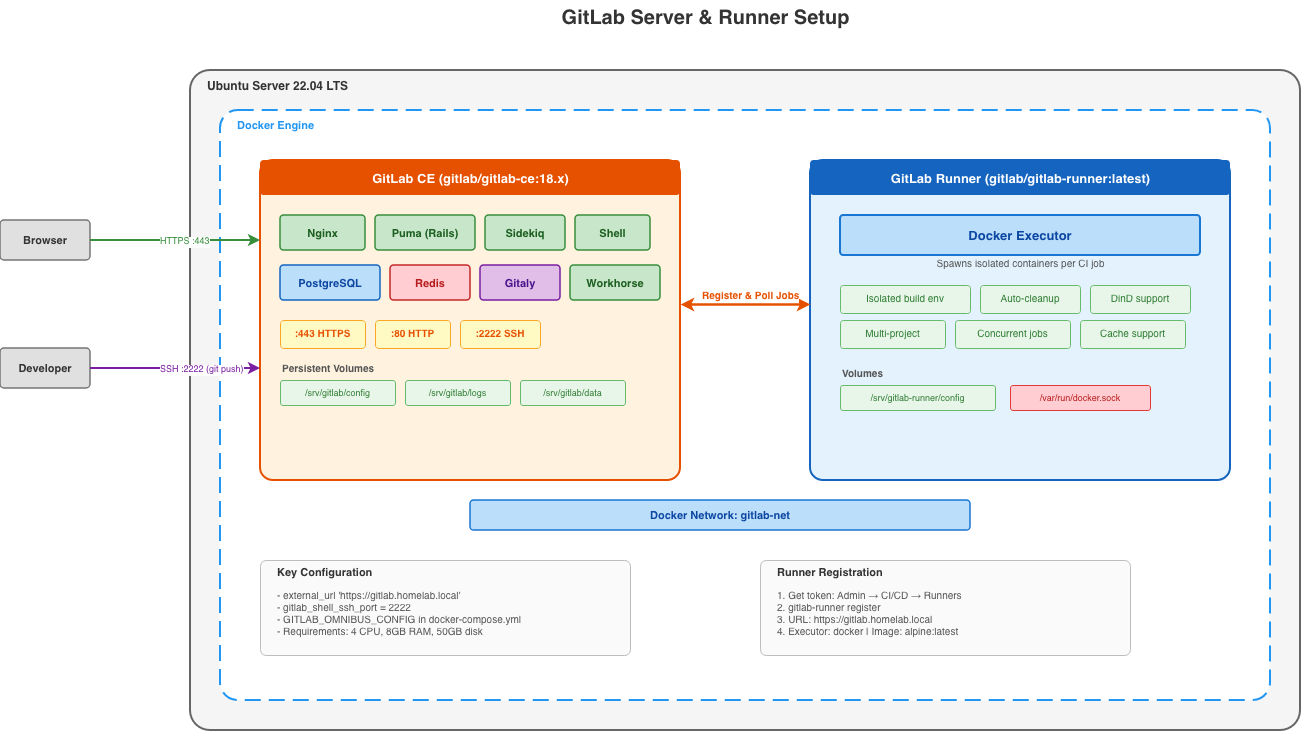
A. Install Gitlab Server
Step 1: Prepare Environment
Explanation: We need to prepare directories for GitLab data storage and ensure the system is ready.
Commands:
1
2
3
4
5
6
7
8
9
10
11
12
13
# Update system
sudo apt update && sudo apt upgrade -y

# Create GitLab home directory
sudo mkdir -p /srv/gitlab/{config,logs,data}

# Set environment variable
export GITLAB_HOME=/srv/gitlab
echo "export GITLAB_HOME=/srv/gitlab" >> ~/.bashrc

# Verify Docker is running
docker --version
docker compose version
Expected Output:
1
2
Docker version 24.0.x, build xxxxx
Docker Compose version v2.x.x
Step 2: Create Docker Compose File
Explanation: The Docker Compose file defines how the GitLab container will be configured and run.
Command:
1
2
# Create gitlab-server directory
mkdir -p ~/gitlab-server && cd ~/gitlab-server
Create docker-compose.yml:
1
2
3
4
5
6
7
8
9
10
11
12
13
14
15
16
17
18
19
20
21
22
23
24
25
26
27
28
29
30
31
32
33
34
35
36
37
38
39
40
41
42
43
44
45
46
services:
  gitlab:
    image: gitlab/gitlab-ce:18.11.7-ce.0
    container_name: gitlab
    restart: always
    hostname: 'gitlab.local'
    environment:
      GITLAB_OMNIBUS_CONFIG: |
        # External URL - replace with your server IP/domain
        external_url 'http://YOUR_SERVER_IP'

        # SSH port
        gitlab_rails['gitlab_shell_ssh_port'] = 2222

        # Timezone
        gitlab_rails['time_zone'] = 'Asia/Jakarta'

        # Disable built-in registry (we use Harbor)
        registry['enable'] = false

        # Disable strict origin check (required for GitLab 18.x)
        gitlab_rails['action_controller_forgery_protection_origin_check'] = false

        # Performance tuning for 8GB RAM
        puma['worker_processes'] = 2
        sidekiq['max_concurrency'] = 10
        postgresql['shared_buffers'] = "256MB"

        # Prometheus monitoring
        prometheus_monitoring['enable'] = true

    ports:
      - '80:80'
      - '443:443'
      - '2222:22'
    volumes:
      - '/srv/gitlab/config:/etc/gitlab'
      - '/srv/gitlab/logs:/var/log/gitlab'
      - '/srv/gitlab/data:/var/opt/gitlab'
    shm_size: '256m'
    healthcheck:
      test: ["CMD", "curl", "-f", "http://localhost/-/health"]
      interval: 60s
      timeout: 30s
      retries: 5
      start_period: 300s
Replace YOUR_SERVER_IP with your actual server IP address!
Step 3: Start GitLab
Explanation: Start the GitLab container. The first-time initialization takes approximately 5-10 minutes.
Command:
1
2
3
4
5
# Start GitLab
docker compose up -d

# Watch logs
docker logs -f gitlab
Expected Output:
1
2
Creating network "gitlab-server_default" with the default driver
Creating gitlab ... done
Verification:
1
2
3
4
5
# Check container status
docker ps

# Wait for GitLab to be ready (check health)
docker inspect gitlab --format=''
Expected Output:
1
2
CONTAINER ID   IMAGE                          STATUS                    PORTS
xxxxxxxxxxxx   gitlab/gitlab-ce:18.11.7-ce.0   Up X minutes (healthy)    0.0.0.0:80->80/tcp...

Step 4: Wait for GitLab Initialization
Explanation: GitLab requires time for initialization. We need to wait until all services are ready.
Command:
1
2
# Check GitLab status
docker exec gitlab gitlab-ctl status
Expected Output (when ready):
1
2
3
4
5
6
7
8
9
10
11
12
13
14
run: alertmanager: (pid 1234) 300s; run: log: (pid 1235) 300s
run: gitaly: (pid 1236) 300s; run: log: (pid 1237) 300s
run: gitlab-exporter: (pid 1238) 300s; run: log: (pid 1239) 300s
run: gitlab-workhorse: (pid 1240) 300s; run: log: (pid 1241) 300s
run: logrotate: (pid 1242) 300s; run: log: (pid 1243) 300s
run: nginx: (pid 1244) 300s; run: log: (pid 1245) 300s
run: postgres-exporter: (pid 1246) 300s; run: log: (pid 1247) 300s
run: postgresql: (pid 1248) 300s; run: log: (pid 1249) 300s
run: prometheus: (pid 1250) 300s; run: log: (pid 1251) 300s
run: puma: (pid 1252) 300s; run: log: (pid 1253) 300s
run: redis: (pid 1254) 300s; run: log: (pid 1255) 300s
run: redis-exporter: (pid 1256) 300s; run: log: (pid 1257) 300s
run: sidekiq: (pid 1258) 300s; run: log: (pid 1259) 300s
run: sshd: (pid 1260) 300s; run: log: (pid 1261) 300s
Step 5: Get Initial Root Password
Explanation: GitLab automatically generates a root password during the first run.
Command:
1
2
# Get initial root password
docker exec gitlab grep 'Password:' /etc/gitlab/initial_root_password
Expected Output:
1
Password: xxxxxxxxxxxxxxxxxxxxxxxxxxx
Important: Save this password immediately!. The password file is automatically deleted after 24 hours. Change the password right after your first login
Step 6: Access GitLab Web Interface
Explanation: Access GitLab through your browser.
Steps:
1
2
3
4
5
Open your browser
Navigate to http://YOUR_SERVER_IP
Log in with:
    Username: root
    Password: (from Step 5)
Expected Result:
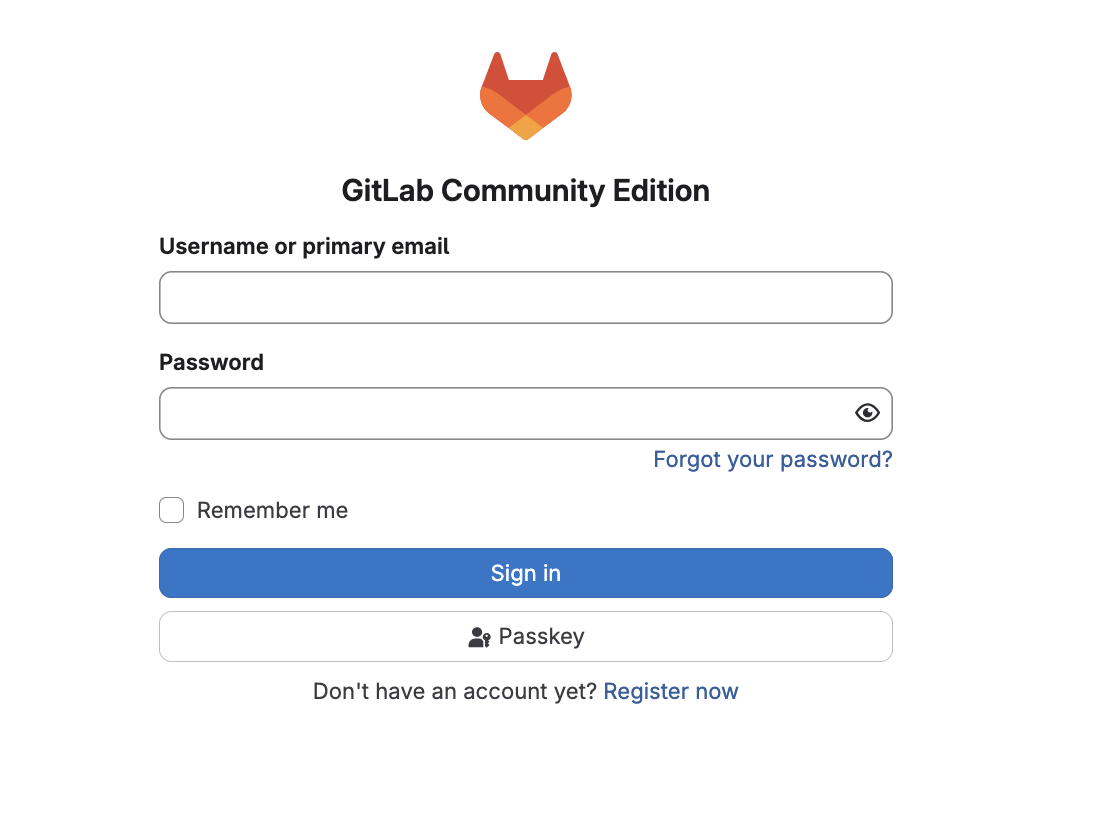
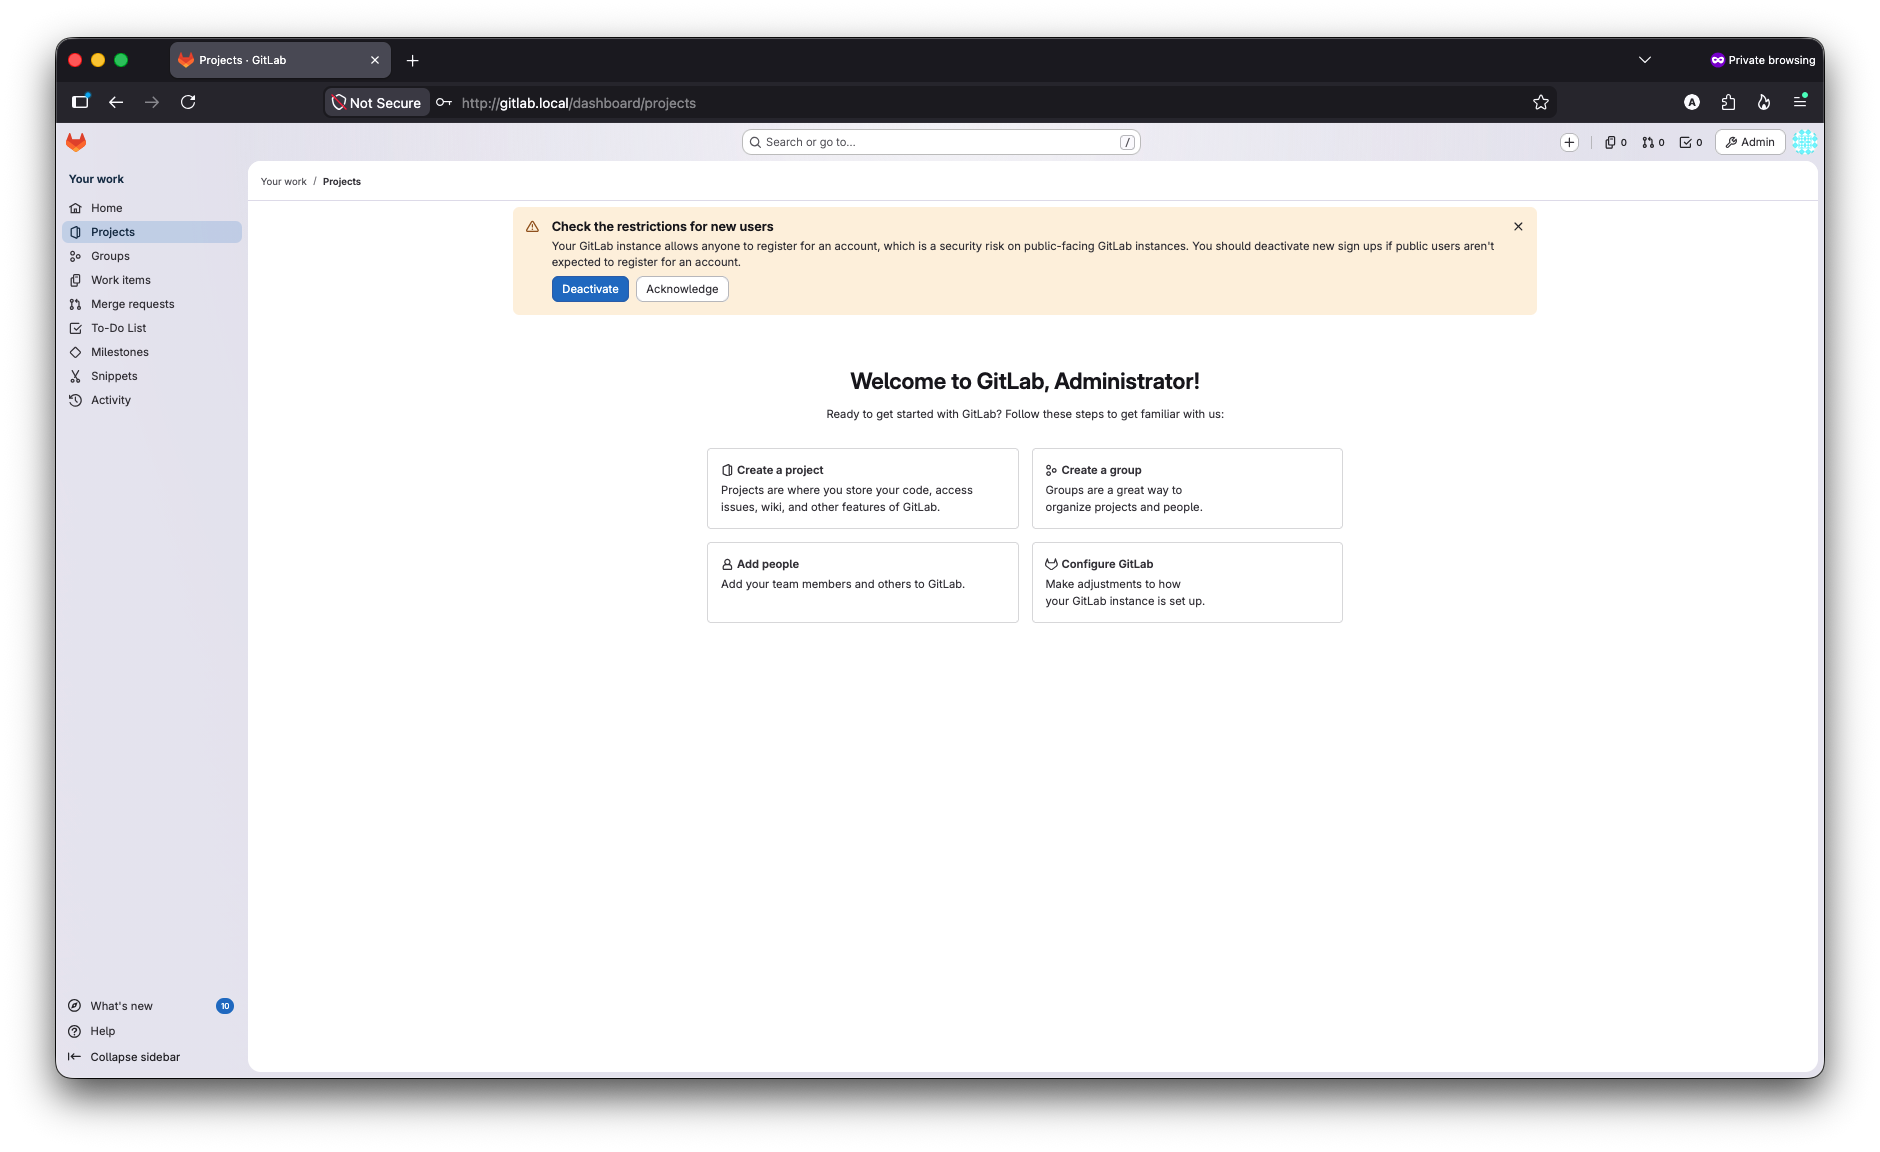
Step 7: Verify Installation
Explanation: Ensure all GitLab components are running properly.
Commands:
1
2
3
4
5
# Run GitLab check
docker exec gitlab gitlab-rake gitlab:check SANITIZE=true

# Check environment info
docker exec gitlab gitlab-rake gitlab:env:info
Expected Output:
1
2
3
4
5
6
7
8
9
10
11
12
13
14
15
16
17
18
19
20
21
Checking GitLab subtasks ...

Checking GitLab Shell ...
GitLab Shell: ... GitLab Shell version >= 14.x.x ? ... yes
Running /opt/gitlab/embedded/service/gitlab-shell/bin/check
Internal API available: OK
...

Checking Gitaly ...
Gitaly: ... default ... OK

Checking Sidekiq ...
Sidekiq: ... Running? ... yes
...

Checking GitLab App ...
Git configured correctly? ... yes
Database config exists? ... yes
...

Checking GitLab subtasks ... Finished
B. SSL Configuration
Use this option for development or internal networks.
Step 1: Create SSL Directory
1
2
3
# Create SSL directory
sudo mkdir -p /srv/gitlab/config/ssl
cd /srv/gitlab/config/ssl
Step 2: Generate Self-Signed Certificate
Explanation: We will create a certificate valid for 365 days with Subject Alternative Names (SANs). Modern browsers require SANs for certificate validation.
Command:
1
2
3
4
5
6
# Generate private key and certificate with SANs
sudo openssl req -x509 -nodes -days 365 -newkey rsa:2048 \
  -keyout gitlab.key \
  -out gitlab.crt \
  -subj "/C=ID/ST=Jakarta/L=Jakarta/O=Company/OU=IT/CN=gitlab.local" \
  -addext "subjectAltName=DNS:gitlab.local,IP:YOUR_SERVER_IP"
1
2
3
# Set proper permissions
sudo chmod 600 gitlab.key
sudo chmod 644 gitlab.crt
Replace YOUR_SERVER_IP with your actual server IP address (e.g., IP:192.168.1.100).
Expected Output:
1
2
3
4
Generating a RSA private key
...+++++
...+++++
writing new private key to 'gitlab.key'
Step 3: Update GitLab Configuration
Explanation: Update docker-compose.yml to use HTTPS.
Edit docker-compose.yml:
1
2
3
4
5
6
7
8
9
10
11
12
13
14
15
16
17
18
19
20
21
22
23
24
25
26
27
28
29
30
31
32
33
34
35
36
37
38
39
40
41
services:
  gitlab:
    image: gitlab/gitlab-ce:18.11.7-ce.0
    container_name: gitlab
    restart: always
    hostname: 'gitlab.local'
    environment:
      GITLAB_OMNIBUS_CONFIG: |
        # HTTPS URL
        external_url 'https://gitlab.local'

        # SSL Configuration
        nginx['redirect_http_to_https'] = true
        nginx['ssl_certificate'] = "/etc/gitlab/ssl/gitlab.crt"
        nginx['ssl_certificate_key'] = "/etc/gitlab/ssl/gitlab.key"

        # SSH port
        gitlab_rails['gitlab_shell_ssh_port'] = 2222

        # Timezone
        gitlab_rails['time_zone'] = 'Asia/Jakarta'

        # Disable built-in registry
        registry['enable'] = false

        # Disable strict origin check (required for GitLab 18.x)
        gitlab_rails['action_controller_forgery_protection_origin_check'] = false

        # Performance tuning
        puma['worker_processes'] = 2
        sidekiq['max_concurrency'] = 10

    ports:
      - '80:80'
      - '443:443'
      - '2222:22'
    volumes:
      - '/srv/gitlab/config:/etc/gitlab'
      - '/srv/gitlab/logs:/var/log/gitlab'
      - '/srv/gitlab/data:/var/opt/gitlab'
    shm_size: '256m'
Step 4: Restart GitLab
1
2
3
4
5
6
# Restart GitLab
docker compose down
docker compose up -d

# Wait for reconfiguration
docker logs -f gitlab
Step 5: Verify HTTPS
1
2
3
4
5
6
# Test HTTPS (ignore certificate warning for self-signed)
curl -k https://gitlab.local

# Or access via browser
# https://gitlab.local (accept certificate warning)
# Make sure gitlab.local is in your /etc/hosts

C. Initial Setup
Step 1: Change Root Password
Explanation: The auto-generated root password must be changed immediately.
Via Web UI:
- Log in to GitLab as root
- Click avatar in the top right → Edit profile
- In the left sidebar, click Access > Password and Authentication
- Enter:
- Current password: (initial password)
- New password: (a strong new password)
- Password confirmation: (repeat new password)
- Click Save password
Via Rails Console:
1
2
3
4
5
6
7
8
9
# Access Rails console
docker exec -it gitlab gitlab-rails console

# Change root password
user = User.find_by(username: 'root')
user.password = 'NewSecurePassword123!'
user.password_confirmation = 'NewSecurePassword123!'
user.save!
exit
Replace
NewSecurePassword123!with your own strong password.
Step 2: Create Admin User
Best practice: don’t use root for daily operations. Create a separate admin user.
Via Web UI:
- Log in as root
- Go to Admin Area (wrench icon)
- Click Users → New user
Fill in:
- Name: Admin User
- Username: admin-company
- Email: admin@company.com
- Access level: Admin
- Click Create user
- Click Edit → Set password
Via Rails Console:
1
2
3
4
5
6
7
8
9
10
11
12
13
14
docker exec -it gitlab gitlab-rails console

# Create admin user
admin = User.new(
  username: 'admin',
  email: 'admin@company.com',
  name: 'Admin User',
  password: 'SecureAdminPass123!',
  password_confirmation: 'SecureAdminPass123!',
  admin: true
)
admin.skip_confirmation!
admin.save!
exit
Step 3: Disable Sign-Up
Explanation: For on-premises deployments, public sign-up should be disabled.
Via Web UI:
- Go to Admin Area → Settings → General
- Expand New user account restrictions
- Uncheck Allow new user accounts
- Click Save changes
Via gitlab.rb (in docker-compose.yml):
Add to GITLAB_OMNIBUS_CONFIG:
1
2
# Disable sign-up
gitlab_rails['gitlab_signup_enabled'] = false
Then reconfigure:
1
2
docker compose down
docker compose up -d
Step 4: Configure Password Policy
Via Web UI:
- Go to Admin Area → Settings → General
- Expand Sign-in restrictions
Set:
- Minimum password length: 12
- Require numbers:
- Require uppercase:
- Require lowercase:
- Require symbols:
- Click Save changes
Step 5: Enable Two-Factor Authentication (2FA)
For Individual User:
- Log in to GitLab
- Click avatar → Edit profile
- Click Account in the sidebar
- Click Enable Two-factor Authentication
- Scan QR code with an authenticator app (Google Authenticator, Authy, etc.)
- Enter verification code
- Save recovery codes!
Enforce 2FA for All Users:
- Go to Admin Area → Settings → General
- Expand Sign-in restrictions
- Check Enforce two-factor authentication
- Set grace period (e.g., 3 days)
- Click Save changes
Step 6: Configure Session Settings
Via Web UI:
- Go to Admin Area → Settings → General
- Expand Sign-in restrictions
- Set:
- Session duration: 10080 (7 days in minutes)
- Or shorter for higher security: 1440 (24 hours)
- Click Save changes
Step 7: Configure Visibility Settings
Explanation: Set default visibility for new projects.
Via Web UI:
- Go to Admin Area → Settings → General
- Expand Visibility and access controls
- Set:
- Default project visibility: Private
- Default snippet visibility: Private
- Default group visibility: Private
- Restricted visibility levels: Check Public (disable public projects)
- Click Save changes
Step 8: Configure Rate Limiting
Via Web UI (recommended for GitLab 18.x):
- Go to Admin Area → Settings → Network
- Expand User and IP rate limits
Set:
- Unauthenticated API requests per period: 3600
- Authenticated API requests per period: 7200
- Period in seconds: 60
- Click Save changes
Via gitlab.rb (in docker-compose.yml):
Add to GITLAB_OMNIBUS_CONFIG:
1
2
# Rate limiting
gitlab_rails['rate_limiting_response_text'] = "Too many requests. Please try again later."
Then reconfigure:
1
2
docker compose down
docker compose up -d
Step 9: Create Initial Groups and Projects
Create Group:
- Click Groups → New group
- Fill in:
- Group name: engineering
- Group URL: engineering
- Visibility: Private
- Click Create group
Create Subgroups:
- Click New subgroup
1
2
3
4
engineering/
├── backend/
├── frontend/
└── devops/
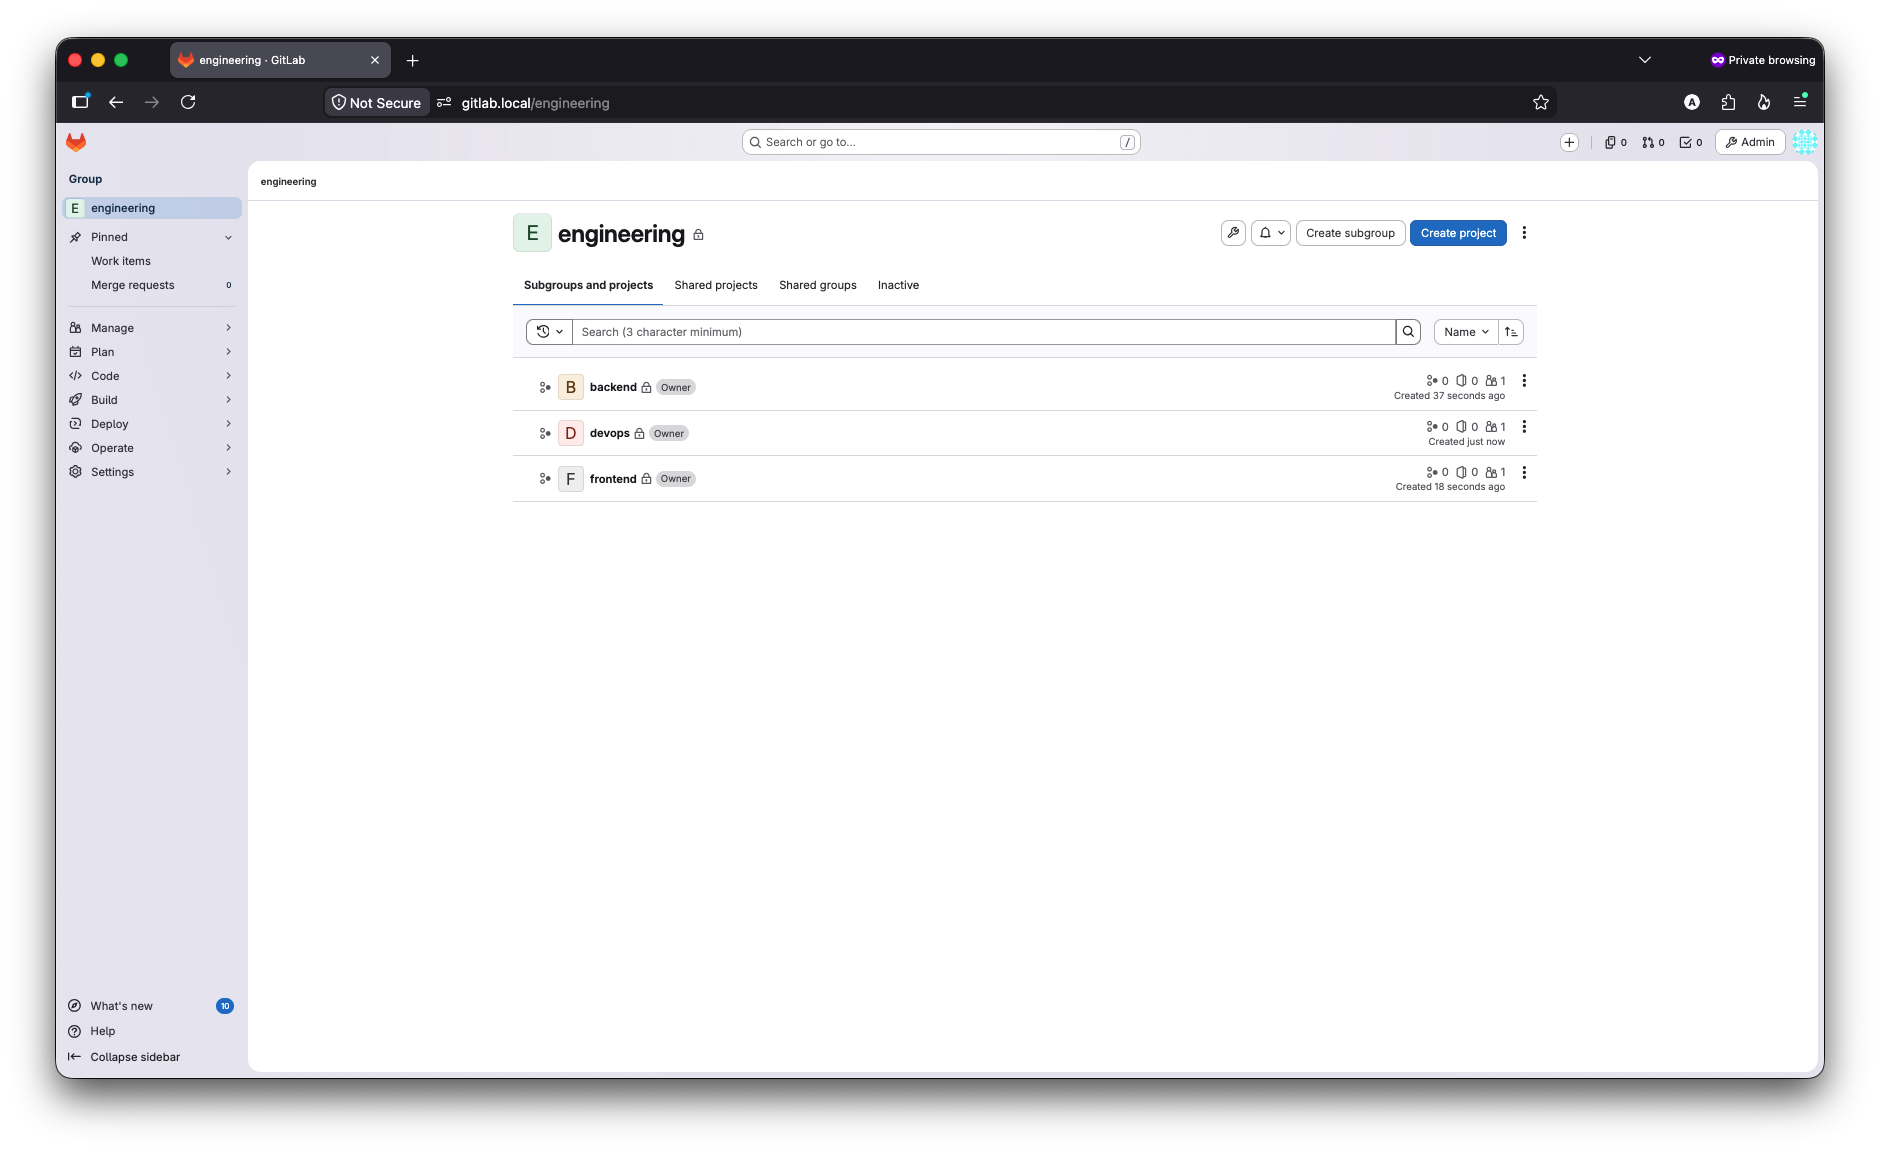
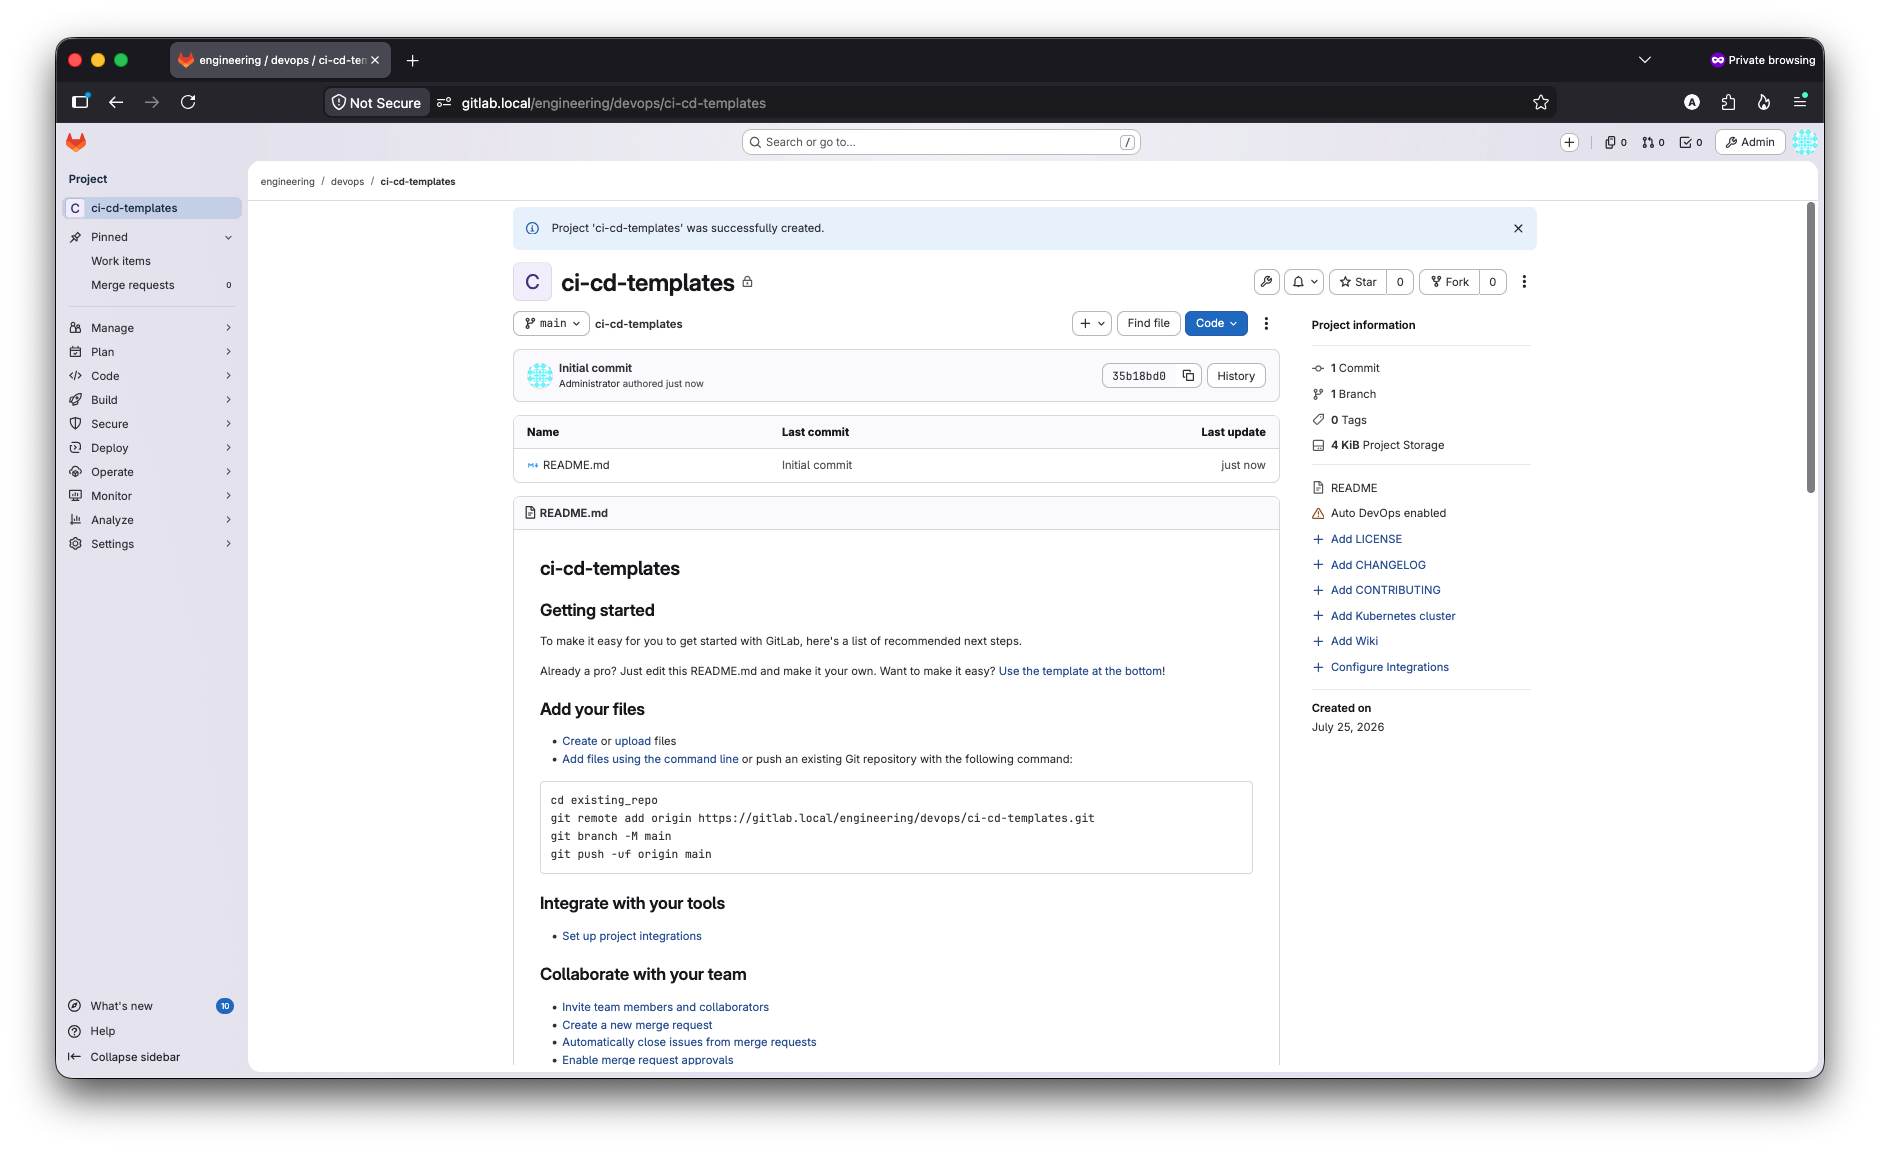
Create Test Project:
- Go to group engineering/devops
- Click Create project
- Select Create blank project
- Fill in:
- Project name: ci-cd-templates
- Visibility: Private
- Click Create project
Step 10: Configure Protected Branches
For the test project:
- Go to project → Settings → Repository
- Expand Protected branches
Add protection for main:
- Branch: main
- Allowed to merge: Maintainers
- Allowed to push: No one
- Click Protect
Step 11: Verify Security Settings
Run Security Check:
1
2
# Check GitLab configuration
docker exec gitlab gitlab-rake gitlab:check SANITIZE=true
Verify Settings via API:
1
2
3
# Get current settings (requires admin token)
curl -k --header "PRIVATE-TOKEN: <your-token>" \
"https://gitlab.local/api/v4/application/settings" | jq .
D. Install Runner
Step 1: Update System
Explanation: Before installation, make sure the system is up-to-date to avoid dependency issues.
Command:
1
sudo apt update && sudo apt upgrade -y
Expected Output:
1
2
3
4
Reading package lists... Done
Building dependency tree... Done
...
0 upgraded, 0 newly installed, 0 to remove and 0 not upgraded.
Verification:
1
cat /etc/os-release | grep VERSION
Expected:
1
2
VERSION="22.04.3 LTS (Jammy Jellyfish)"
VERSION_ID="22.04"
Step 2: Install Dependencies
GitLab Runner requires several dependencies to run properly.
Command:
1
sudo apt install -y curl git ca-certificates gnupg lsb-release
Expected Output:
1
2
3
4
Reading package lists... Done
Building dependency tree... Done
...
Setting up curl (7.81.0-1ubuntu1.x) ...
Verification:
1
2
curl --version | head -1
git --version
Expected:
1
2
curl 7.81.0 (x86_64-pc-linux-gnu)
git version 2.34.1
Step 3: Add GitLab Runner Repository
We will add the official GitLab Runner repository to get the latest version.
Command:
1
2
# Download and run the repository script
curl -L "https://packages.gitlab.com/install/repositories/runner/gitlab-runner/script.deb.sh" | sudo bash
Expected Output:
1
2
3
4
5
Detected operating system as Ubuntu/jammy.
Checking for curl...
Detected curl...
...
The repository is setup! You can now install packages.
Verification:
1
2
# Check repository has been added
cat /etc/apt/sources.list.d/runner_gitlab-runner.list
Expected:
1
2
deb https://packages.gitlab.com/runner/gitlab-runner/ubuntu/ jammy main
deb-src https://packages.gitlab.com/runner/gitlab-runner/ubuntu/ jammy main
Step 4: Install GitLab Runner
Explanation: Now we install GitLab Runner from the repository we just added.
Command:
1
2
sudo apt update
sudo apt install -y gitlab-runner
Expected Output:
1
2
3
4
5
Reading package lists... Done
...
Setting up gitlab-runner (18.x.x) ...
...
GitLab Runner installed successfully!
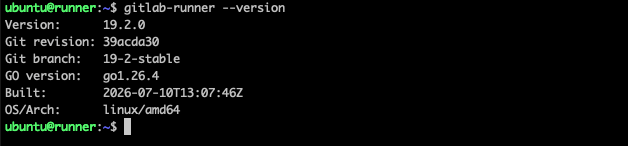
Verification:
1
gitlab-runner --version
Expected:
1
2
3
4
5
6
Version:      18.x.x
Git revision: xxxxxxxx
Git branch:   18-x-stable
GO version:   go1.23.x
Built:        2026-xx-xxTxx:xx:xxZ
OS/Arch:      linux/amd64
Step 5: Verify Service Status
Explanation: GitLab Runner runs as a systemd service. Make sure the service is running.
Command:
1
sudo systemctl status gitlab-runner
Expected Output:
1
2
3
4
5
6
7
8
9
● gitlab-runner.service - GitLab Runner
     Loaded: loaded (/etc/systemd/system/gitlab-runner.service; enabled; vendor preset: enabled)
     Active: active (running) since Mon 2026-xx-xx xx:xx:xx UTC; 1min ago
   Main PID: xxxx (gitlab-runner)
      Tasks: 8 (limit: 4915)
     Memory: 20.0M
        CPU: 100ms
     CGroup: /system.slice/gitlab-runner.service
             └─xxxx /usr/bin/gitlab-runner run --working-directory /home/gitlab-runner --config /etc/gitlab-runner/config.toml
Verification:
1
2
# Check service enabled on boot
sudo systemctl is-enabled gitlab-runner
Expected:
enabled
Step 6: Add gitlab-runner to Docker Group
Explanation: For the Runner to use the Docker executor, the gitlab-runner user needs access to the Docker daemon.
Command:
1
sudo usermod -aG docker gitlab-runner
Verification:
1
2
# Check group membership
groups gitlab-runner
Expected:
1
gitlab-runner : gitlab-runner docker
Restart Service:
1
sudo systemctl restart gitlab-runner
Step 7: Verify Docker Access
Explanation: Make sure the gitlab-runner user can run Docker commands.
Command:
1
sudo -u gitlab-runner docker ps
Expected Output:
1
CONTAINER ID   IMAGE   COMMAND   CREATED   STATUS   PORTS   NAMES
If you get a “permission denied” error, restart the server or logout/login.
Step 8: Check Directory Structure
Understand the GitLab Runner directory structure for troubleshooting.
Command:
1
2
3
4
5
6
7
8
# Config directory
ls -la /etc/gitlab-runner/

# Home directory
ls -la /home/gitlab-runner/

# Builds directory (will be created when the first job runs)
ls -la /home/gitlab-runner/builds/ 2>/dev/null || echo "Builds directory does not exist yet"
Expected Output:
1
2
3
4
5
6
7
8
9
10
11
12
13
# /etc/gitlab-runner/
total 12
drwxr-xr-x   2 root root 4096 xxx xx xx:xx .
drwxr-xr-x 100 root root 4096 xxx xx xx:xx ..
-rw-------   1 root root    0 xxx xx xx:xx config.toml

# /home/gitlab-runner/
total 20
drwxr-xr-x 2 gitlab-runner gitlab-runner 4096 xxx xx xx:xx .
drwxr-xr-x 4 root          root          4096 xxx xx xx:xx ..
-rw-r--r-- 1 gitlab-runner gitlab-runner  220 xxx xx xx:xx .bash_logout
-rw-r--r-- 1 gitlab-runner gitlab-runner 3771 xxx xx xx:xx .bashrc
-rw-r--r-- 1 gitlab-runner gitlab-runner  807 xxx xx xx:xx .profile
E. Register Runner
Step 1: Obtain Token from GitLab (New Method - GitLab 15.6+)
With the new method, you must create a runner in the GitLab UI first, then obtain an authentication token for registration.
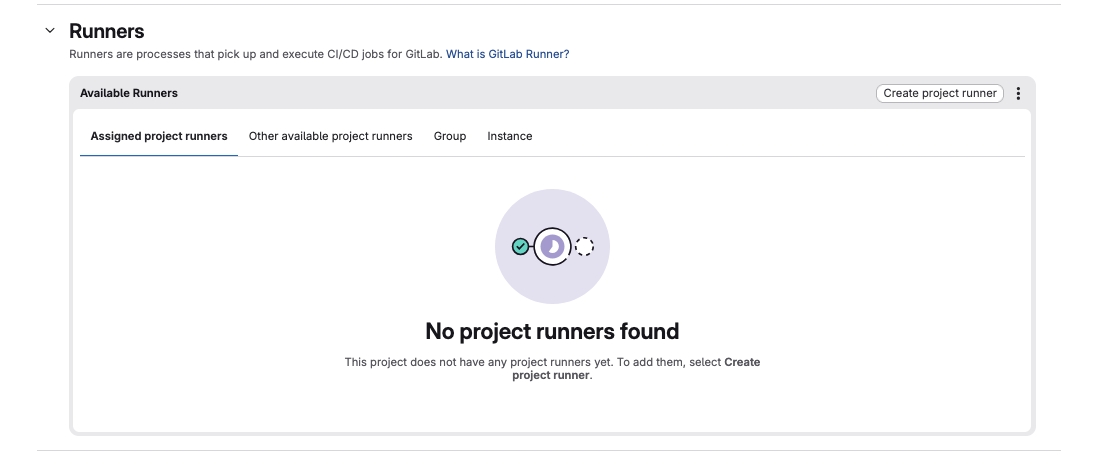
Step 1.1: Create Runner in GitLab UI
- Open your GitLab project/group
- Navigate to Settings → CI/CD
- Expand the Runners section
- Click “Create project runner”
Step 1.2: Configure Runner in the Form
Fill in the form with the following configuration:
| Field | Value | Notes |
|---|---|---|
| Tags | docker,fintech,build | Comma-separated |
| Description | fintech-runner-01 | Runner name |
| Run untagged jobs | ☑️ or ☐ | As needed |
| Lock to current project | ☐ | Usually not locked |
| Maximum job timeout | 3600 | 1 hour (optional) |
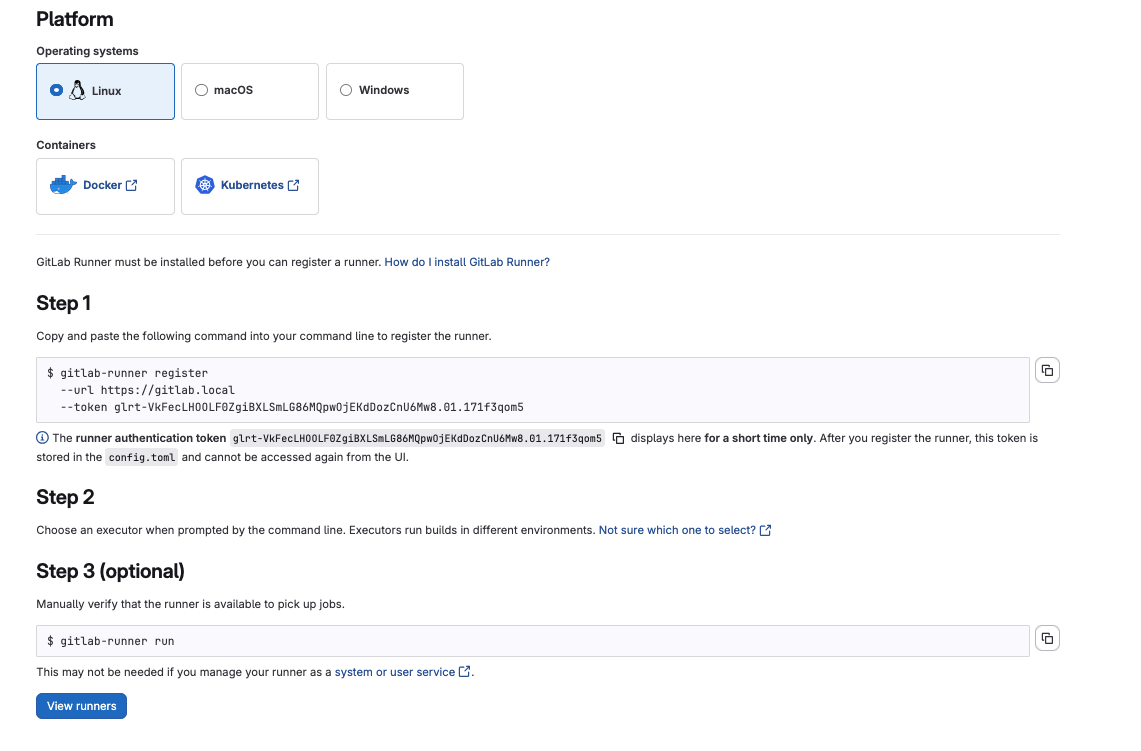
After clicking “Create runner”, an authentication token will appear:
1
glrt-VkFecLHOOLF0ZgiBXLSmLG86MQpwOjEKdDozCnU6Mw8.01.171f3qom5
IMPORTANT: The token is only shown ONCE! Make sure you save it.
Step 2: Register Runner with Self-Signed SSL Certificate
If GitLab uses a self-signed certificate, you need to add the CA certificate.
Step 2.1: Copy Certificate to Runner
1
2
3
4
5
6
7
8
# Create directory for certificates
sudo mkdir -p /etc/gitlab-runner/certs

# Copy certificate from GitLab server (or download)
scp /srv/gitlab/config/ssl/gitlab.crt ubuntu@RUNNER_IP:/home/ubuntu/

# Move file to gitlab-runner certs
sudo cp gitlab.crt /etc/gitlab-runner/certs
Step 2.2: Register with TLS CA File
1
2
3
4
5
6
7
8
9
10
sudo gitlab-runner register \
  --non-interactive \
  --url "https://gitlab.local" \
  --token "glrt-xxxxxxxxxxxxxxxxxxxxxxxxxxxx" \
  --tls-ca-file "/etc/gitlab-runner/certs/gitlab.crt" \
  --description "fintech-runner-01" \
  --executor "docker" \
  --docker-image "docker:27.0" \
  --docker-privileged=true \
  --docker-volumes "/var/run/docker.sock:/var/run/docker.sock"
Expected Output:
1
2
3
4
5
6
7
Runtime platform                                    arch=amd64 os=linux pid=37423 revision=39acda30 version=19.2.0
Running in system-mode.

Verifying runner... is valid                        correlation_id=01KYC4WXQGBJSFD60J8ZN5BJ3X runner=VkFecLHOO runner_name=fintech-runner-01
Runner registered successfully. Feel free to start it, but if it's running already the config should be automatically reloaded!

Configuration (with the authentication token) was saved in "/etc/gitlab-runner/config.toml"
Tip: If you get the error x509: certificate relies on legacy Common Name field, use SANs instead, see gitlab server SSL section.
Step 3: Verify Registration in GitLab UI
Open GitLab → Settings → CI/CD → Runners
The runner should appear with a green status (online)
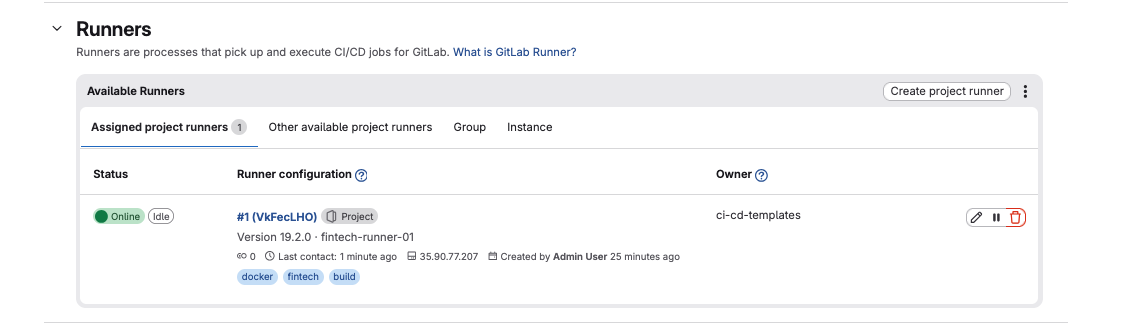
Verification from CLI:
1
2
3
4
5
# List runners
sudo gitlab-runner list

# Verify connection
sudo gitlab-runner verify
Expected Output:
1
Verifying runner... is valid                        runner=glrt-xxxx

Step 4: Check Config File
1
sudo cat /etc/gitlab-runner/config.toml
Expected Output:
1
2
3
4
5
6
7
8
9
10
11
12
13
14
15
16
17
18
19
20
21
22
23
concurrent = 1
check_interval = 0

[session_server]
  session_timeout = 1800

[[runners]]
  name = "fintech-runner-01"
  url = "https://gitlab.local"
  id = 1
  token = "glrt-xxxxxxxxxxxx"
  token_obtained_at = 2026-07-20T00:00:00Z
  token_expires_at = 0001-01-01T00:00:00Z
  executor = "docker"
  [runners.docker]
    tls_verify = false
    image = "docker:29.6.2"
    privileged = true
    disable_entrypoint_overwrite = false
    oom_kill_disable = false
    disable_cache = false
    volumes = ["/var/run/docker.sock:/var/run/docker.sock", "/cache:/cache"]
    shm_size = 0
Step 5: Register Multiple Runners (Optional)
For production, register multiple runners with different configurations:
Runner for Build (Heavy):
1
2
3
4
5
6
7
8
9
10
11
12
13
14
# Create runner in GitLab UI first, get token, then:

sudo gitlab-runner register \
  --non-interactive \
  --url "https://gitlab.local" \
  --token "glrt-BUILD_TOKEN_HERE" \
  --tls-ca-file "/etc/gitlab-runner/certs/gitlab.crt" \
  --description "fintech-runner-heavy" \
  --executor "docker" \
  --docker-image "docker:27.0" \
  --docker-privileged=true \
  --docker-memory "8g" \
  --docker-cpus "4" \
  --limit 1
Runner for Test (Light):
1
2
3
4
5
6
7
8
9
10
11
sudo gitlab-runner register \
  --non-interactive \
  --url "https://gitlab.local" \
  --token "glrt-TEST_TOKEN_HERE" \
  --tls-ca-file "/etc/gitlab-runner/certs/gitlab.crt" \
  --description "fintech-runner-test" \
  --executor "docker" \
  --docker-image "alpine:latest" \
  --docker-memory "2g" \
  --docker-cpus "2" \
  --limit 4
F. Configure Runner
Understanding config.toml,
- File Location ```bash
Default location
/etc/gitlab-runner/config.toml
Check current config
sudo cat /etc/gitlab-runner/config.toml
1
2
3
4
5
6
7
8
9
10
11
12
13
14
15
16
17
18
19
20
21

- Config Structure
```toml
# Global settings
concurrent = 4          # Max concurrent jobs across all runners
check_interval = 3      # Interval (seconds) to check for new jobs
log_level = "info"      # Log verbosity
log_format = "json"     # Log format

[session_server]
  session_timeout = 1800

# Runner definitions (can have multiple)
[[runners]]
  name = "runner-name"
  url = "https://gitlab.example.com"
  token = "runner-token"
  executor = "docker"

  [runners.docker]
    # Docker executor settings
Step 1: Backup Current Config
Explanation: Always back up the config before making changes.
Command:
1
sudo cp /etc/gitlab-runner/config.toml /etc/gitlab-runner/config.toml.backup
Verification:
1
ls -la /etc/gitlab-runner/
Expected Output:
1
2
-rw------- 1 root root 1234 Jan  1 00:00 config.toml
-rw------- 1 root root 1234 Jan  1 00:00 config.toml.backup
Step 2: Configure Global Settings
Explanation: Global settings affect all runners configured in this file.
Edit config.toml:
1
2
3
4
5
6
7
8
9
10
11
12
13
14
15
16
17
18
19
20
21
22
23
24
sudo nano /etc/gitlab-runner/config.toml

Add/Modify Global Settings:
```toml
# ============================================
# Global Configuration
# ============================================

# Maximum number of concurrent jobs
# Adjust based on server capacity
concurrent = 4

# Interval to check for new jobs (seconds)
check_interval = 3

# Log settings
log_level = "info"
log_format = "json"

# Sentry DSN for error tracking (optional)
# sentry_dsn = "https://xxx@sentry.io/xxx"

[session_server]
  session_timeout = 1800
Options Explained:
| Option | Description | Recommended |
|---|---|---|
concurrent | Max simultaneous jobs | CPU cores - 1 |
check_interval | Polling interval | 3-5 seconds |
log_level | debug, info, warn, error | info |
log_format | text, json | json (for parsing) |
Step 3: Configure Docker Executor
Explanation: The Docker executor is the most commonly used. Proper configuration is essential for performance and security.
Security Notes:
privileged = true— gives the container full access to the host. Required for Docker-in-Docker (DinD), but is a security risk. Only use if your pipeline needsdocker build.tls_verify = false— disables TLS certificate verification. Acceptable for self-signed certs on internal networks, but in production with a public CA, always set totrue.
Add Docker Configuration:
1
2
3
4
5
6
7
8
9
10
11
12
13
14
15
16
17
18
19
20
21
22
23
24
25
26
27
28
29
30
31
32
33
34
35
36
37
38
39
40
41
42
43
44
45
46
47
48
49
50
51
52
53
54
[[runners]]
  name = "fintech-runner-01"
  url = "https://gitlab.internal.fintech.local"
  token = "YOUR_RUNNER_TOKEN"
  executor = "docker"

  # Limit concurrent jobs for this runner
  limit = 2

  # Output limit (bytes) - 4MB
  output_limit = 4096

  # Build directory
  builds_dir = "/builds"
  cache_dir = "/cache"

  # Environment variables for all jobs
  environment = [
    "DOCKER_DRIVER=overlay2",
    "DOCKER_TLS_CERTDIR="
  ]

  [runners.custom_build_dir]
    enabled = true

  [runners.docker]
    tls_verify = false
    image = "docker:24.0"
    privileged = true
    disable_entrypoint_overwrite = false
    oom_kill_disable = false
    disable_cache = false

    # Volume mounts
    volumes = [
      "/var/run/docker.sock:/var/run/docker.sock",
      "/cache:/cache:rw",
      "/builds:/builds:rw"
    ]

    # Resource limits
    memory = "2g"
    memory_swap = "4g"
    memory_reservation = "1g"
    cpus = "2"

    # Network mode
    network_mode = "bridge"

    # Pull policy
    pull_policy = ["if-not-present"]

    # Shared memory size (256MB)
    shm_size = 268435456
Step 4: Configure Security Settings
Explanation: Security settings are critical for fintech environments that require compliance.
** IMPORTANT for Self-Hosted GitLab:**
If you are using a local domain (gitlab.local, gitlab.internal.company.local), Docker containers CANNOT resolve those domains because they don’t exist in public DNS.
You MUST configure
extra_hoststo map the hostname to the IP address!
Add Security Configuration:
1
2
3
4
5
6
7
8
9
10
11
12
13
14
15
16
17
18
19
20
21
22
23
24
25
26
27
28
29
30
31
32
33
34
35
36
37
38
39
40
41
42
43
44
45
46
47
48
49
50
51
  [runners.docker]
    # ... previous settings ...

    # ============================================
    # DNS Configuration (REQUIRED for Self-Hosted)
    # ============================================

    # Option 1: Internal DNS server (if available)
    dns = ["10.0.0.2", "10.0.0.3"]
    dns_search = ["internal.fintech.local"]

    # Option 2: Extra hosts mapping (RECOMMENDED)
    # Format: ["hostname:ip_address"]
    #
    # ⚠️ REPLACE IP ADDRESSES with your actual environment values!
    # To check IP: ping gitlab.local (from the host server)
    #
    extra_hosts = [
      "gitlab.internal.fintech.local:10.0.1.10",
      "gitlab.local:10.0.1.10",
      "registry.internal.fintech.local:10.0.1.11",
      "sonarqube.internal.fintech.local:10.0.1.12",
      "vault.internal.fintech.local:10.0.1.13"
    ]

    # Allowed images (whitelist) - SECURITY
    allowed_images = [
      "docker:*",
      "docker/compose:*",
      "registry.internal.fintech.local/*",
      "maven:*",
      "gradle:*",
      "node:*",
      "python:*",
      "golang:*",
      "openjdk:*",
      "eclipse-temurin:*",
      "alpine:*",
      "alpine/git:*",
      "sonarsource/sonar-scanner-cli:*",
      "aquasec/trivy:*"
    ]

    # Allowed services
    allowed_services = [
      "docker:*-dind",
      "postgres:*",
      "redis:*",
      "mysql:*",
      "registry.internal.fintech.local/*"
    ]
Verify extra_hosts is working:
1
2
3
4
# Test from a container
docker run --rm \
  --add-host gitlab.local:10.0.1.10 \
  alpine sh -c "cat /etc/hosts && ping -c 1 gitlab.local"
Step 5: Apply Configuration
Explanation: After editing the config, restart the Runner to apply changes.
Command:
1
2
3
4
5
6
7
8
# Validate config syntax
sudo gitlab-runner verify

# Restart runner
sudo gitlab-runner restart

# Check status
sudo gitlab-runner status
Expected Output:
1
2
3
4
5
Runtime platform                                    arch=amd64 os=linux pid=xxxx revision=xxxxxxxx version=16.x.x
Running in system-mode.

Verifying runner... is alive                        runner=xxxxxxxxxx
Verifying runner... is alive                        runner=yyyyyyyyyy
Step 6: Verify Configuration
Command:
1
2
3
4
5
# List all runners
sudo gitlab-runner list

# Check detailed status
sudo systemctl status gitlab-runner